Emerging Frontiers in Surface Modification: A Critical Investigation of Advanced Anodization Technique for Biomedical Application
Titanium anodizing or titanium oxide coating process has emerged globally nowadays owing to the properties of corrosion resistance, nontoxic & nonreactive nature, improve aesthetically, enhanced fatigue strength, increased osseointegration, exhibits natural biocompatibility, helps in part identification, reduced wear & tear, etc. Titanium anodizing is popular for various applications including aerospace, medical implants, automotive, sports equipment, dental, jewelry, etc. In the present investigation, 08 cylindrical samples of PureTitanium, Grade-4 material (7 for color anodizing and 1 for Type II gray color anodizing) were prepared. After that, samples were thoroughly processed & anodized by using distinct voltage as well as by using an optimum combination of parameters. The constant voltage was used during the anodizing process to achieve a consistent uniform layer thickness. Thereafter, coating thickness was measured on lowest and highest voltage samples, to know the variation of oxide layer formation. Chemical analysis was also performed to know the changes in elemental composition before and after anodizing, whether it comply the standard or not. Finally, all the samples were analyzed for fingerprint issues in case of biomedical applications.
Abbreviation
MSDS: Material Safety Data Sheet.
Introduction
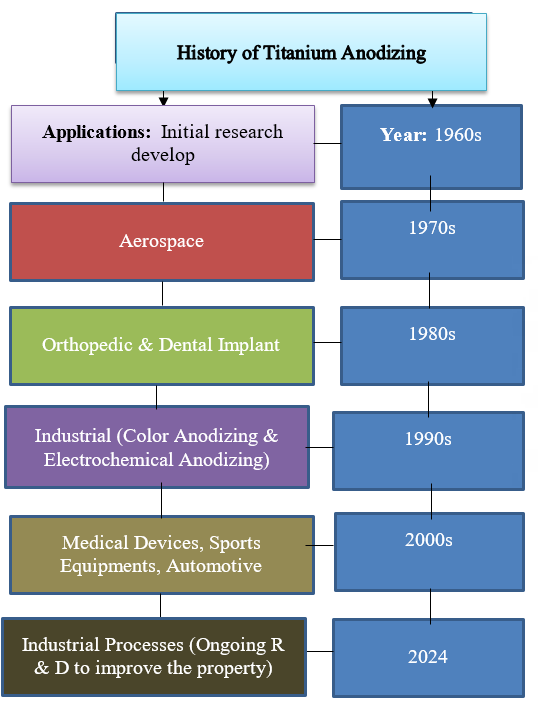
An electrochemical procedure called anodizing is used to coat a material’s surface with a thin layer of oxide. There are several uses for anodized titanium [1, 2] such as Investigation Paper to provide a decorative finish, to shield the metal from rust caused by the atmosphere, to offer heat regulation to lessen friction between moving surfaces, etc. Anodizing results be changed by adjusting different anodization process parameters such as voltage, sample preparation methods, dipping time, electrolyte type & concentration, etc. Anodized titanium may survive for many years with proper care and maintenance. However, it is important to note that extreme circumstances, exposure to abrasive materials, and regular mechanical stress can all influence the anodized coating’s lifespan. The color shift of anodized titanium results from light interference induced by the controlled creation of a thin oxide layer on the metal’s surface during the anodizing process. When titanium is anodized, an electrical current is applied in an electrolytic bath, forming a coating of titanium oxide. Anodizing titanium is a safe technique with no harmful consequences. The technique is non-toxic and uses no hazardous chemicals, making it suitable for use in aerospace and medical applications. The oxide layer that forms during anodization often enhances titanium’s surface hardness and scratch resistance, making it more resistant to wear and abrasion. Anodized titanium is extremely resistant to rust and corrosion. The anodizing process produces a well- integrated and durable oxide coating, which provides good corrosion protection. Heat alone usually does not remove anodizing from a surface. Anodizing forms a long-lasting and stable oxide coating on a metal that is very resistant to heat. However, continuous exposure to extremely high temperatures or heat sources may have an effect on the anodized coating’s look or integrity. Figure 1 depicts the scope of applications and the history of titanium anodizing [3, 4].
The distinct author used distinct processing parameters and chemicals to know the effect of distinct parameters on anodizing color and their properties are explained in the section below.
Napoli G, et al. [5] concentrated on examining the impact of applied electrolytic voltages and the color change of anodized titanium. Using varying voltages, the titanium specimens were anodized in 20 g/L citric acid and 20 g/L baking soda electrolyte. Using a spectrophotometer, the colors of the anodized titanium were measured and subsequently assessed within the CIELAB color space. It has been discovered that various voltages result in various colors. The two grades of titanium alloy that the author utilized, grade II and grade V, did not differ in terms of the colors that were created, but the latter at high voltage produces a grey oxide that is not pleasant on the eyes and ruins all the specimen surface. The author essentially agreed that the coating thickness and current value increase with voltage. Rajguru NS, et al. [6] investigated how anodizing factors affect surface behavior. The authors discussed how anodized titanium and its alloys’ bath parameters affect their coloring behavior and physical characteristics. Apart from this explained the effects of electrolyte, anodizing time, voltage, and concentration on coating properties such as color spectrum, film thickness, hardness, surface roughness, and crystal structure, among others. The different researchers used different materials, chemical percentages, voltage & dipping time to analyze the effect of varying voltage on the color spectrum [7, 8, 9, 10, 11]. The study of various researchers revealed that the color spectrum is not only affected by using different voltages but also affected by the type of electrolyte used. Apart from this, it is also observed that using a different electrolyte on the same material & voltage exhibits a different color spectrum [7]. Dirk J van Vuuren [12] observed that as we increase the anodizing voltage the hardness is also increased. Geng H, et al. [13] study that as the oxidation time increases the thickness also increases. Sharma AK, et al. & Ali K, et al. [1, 14] studied the oxide layer thickness is directly related to anodizing voltage so that by increasing the voltage the anodic film thickness increases. The authors used sulfuric acid on anodized & non-analyzed samples to analyze the effect of corrosion. The study revealed that corrosion is greatly decreased on anodized specimen w.r.t. non-anodized sample which was owing to the development of resistant anodic film. When the anodizing voltage increased to greater voltages the minimal value corrosion rate was found. Hlinka J, et al. [15] showed the rate of corrosion obtained by potentiodynamic polarization was very low. In addition, the anodized surface exhibits showed very high biocompatibility & nearly no cytotoxicity. Wadhwani C, et al. [16] used Ti alloy material & applied different voltages by electrochemical anodization mainly for identification purposes. Manjaiah M, et al. [17] examine the effect of anodizing (by using H2SO4 electrolyte Grade 4 Titanium samples) on the oxide layer thickness and composition, aesthetic appearance, scanning electron microscopy with energy dispersive spectroscopy, and surface topography. For Surface analysis author used consisted of atomic force microscopy, X-ray diffractometry, and UV spectrophotometry. The results revealed that highly- ordered oxide structures in partial anatase and rutile TiO2
substrates are readily achieved. Apart from this it also showed an layer thickness increases as voltage increases, increased roughness (Ra), and changes in surface phase composition are also achieved. Vattanasup C, et al. [18] Anodizing study was conducted for dental application & described that if higher the voltage applied to the anodizing process, the higher the anodic film thickness forms. The distinct thicknesses of titanium oxide film cause variations in refractive index resulting in a desired color on the Titanium alloy material surface. Saraswati WC, et al. [19] studied the effect of corrosion on Grade 5 Titanium Alloy material by potentiodynamic polarization test in Ringer Lactate solution. Surface observation by optical microscope showed that the pore density of the anodic film increased with applied voltage. The cross-sectional FE-SEM images indicated that when we increase the voltage the layer thickness (nm) is also increased. Apart from this, the corrosion resistance increases when applying a higher voltage i.e. with film thickness increment (i.e. higher the voltage lower the current density). Thus titanium anodizing exhibits the dual advantages of surface coloring and corrosion protection but not changing the mechanical characteristics. Kumar A, et al. [20] the use of different electrolyte concentrations versus surface roughness relation, microhardness (anodized & non- anodized samples), SEM analysis at the different voltage for film thickness measurement, SEM for wear study on anodized & non-anodized surface, load increment on anodized & non-anodized samples for examine the hardness. Manjaiah M, et al. [21] According to the study, treating titanium materials with plasma could be a useful way to improve their biocompatibility. It investigated the chemical composition, oxide layer thickness, and nano-surface roughness. The findings indicate that the process of anodizing the Ti64 alloy surface can result in color interference, which is contingent upon the applied voltage and thickness of the oxide layer. The anatase and rutile phase surface oxidation, together with a shift in nanosurface roughness, may enhance the biocompatibility of Ti6Al4V alloy. Diamanti MV, et al. [22] studied the developed thickness of oxide layers as a function of anodizing voltage on different substrates for Ti6Al4V jewels application. Apart from this, the Type III anodizing exhibits a more wear-resistant surface at higher voltage which helps in increasing oxide layer thickness also as compared to Type II Aluminum, aluminum alloys, magnesium, titanium, and stainless steel can be anodized [22]. According to Ohm’s Law, the relationship between voltage (V), current (I), and resistance (R) in a simple resistive circuit is V=I×R. This implies that for a given resistance, voltage is directly proportional to current. However, in the context of anodizing titanium, the relationship between voltage and current is more complex due to the changing nature of the oxide layer.
The author observed that when the voltage is first applied, the current is relatively high because the resistance of the titanium surface is low. Further, as the oxide layer begins to form, the resistance increases, causing the current to decrease if the voltage remains constant. In a simple resistive circuit, voltage is directly proportional to current if the resistance is constant. However, in the anodizing of titanium, the resistance changes as the oxide layer forms, leading to a more complex, dynamic relationship where voltage and current are not directly proportional throughout the process. Instead, the voltage is often kept constant to control the oxide layer thickness and resulting color, while the current varies according to the changing resistance. Apart from this low concentration percentage of chemicals is generally preferred for titanium anodizing because it reduces the risk of burning, enhances biocompatibility, provides uniform coating, and better control. Thus to ensure the best results recommend using highly pure chemicals such as American Chemical Society-grade chemicals, which provide a higher purity level than food-grade chemicals.
Hence, this study was conducted to know the behavior of chemical composition as well as the effects of anodizing parameters on color spectrum & fingerprint issues for biomedical applications.
Research Questions
- Whether the applied constant voltage on the titanium specimen will enhance the color quality or not?
- whether the voltage variation will change the color or not?
- Whether the elemental composition change after anodizing or not?
- Whether chemical composition, Type of chemical, surface preparation, processing parameters, etc. decrease the fingerprint issue?
- Whether the voltage variation alter the thickness of the oxide layer?
Materials and Methods
The current research follows the following steps: (a) Selection of metallic material (PureTitanium, Grade-4) and their chemical, mechanical, and physical properties (b) Equipment, manufacturing technique, and parameters used for sample preparation. (c) The general principle of titanium anodizing (d) Selection of processing parameters and chemicals used for anodizing (d) Samples Testing (coating thickness and elemental analysis) (e) Suggested the best anodizing parameters and results.
Selection of Material
In the current investigation, the material utilized is a cylindrical-shaped PureTitanium, Grade-4 having a 10x20
mm diameter. The pure titanium material was purchased from “India MART Inter MESH Ltd”. This material is selected due to it is a more corrosion-resistant alloy, highly ductile, softer & a greater percentage of titanium elements as compared to Ti6Al4V (Grade 5), etc. The chemical composition, mechanical properties & physical properties of PureTitanium, Grade-4 as per ISO 5832-2:2018 are given in Tables 1a-c respectively.
| Element | % age |
|---|---|
| Titanium | 99.5 |
| Oxygen | 0.2 max. |
| Carbon | 0.08 max. |
| Nitrogen | 0.05 max. |
| Iron | 0.3 max. |
| Hydrogen | 0.015 max. |
Table 1a: Chemical Properties of Pure Titanium.
| Test | Value |
|---|---|
| Ultimate tensile strength | 550-680 MPa |
| Yield strength | 480-580 MPa |
| Elongation at break | 18% min. |
Table 1b: Mechanical Properties of Pure Titanium.
| Property | Value |
|---|---|
| Density | 4.5g/cm3 |
| Melting point | 1668°C |
Table 1c: Physical Properties of Pure Titanium.
Equipment and Parameter Used for Specimen Preparation
The titanium alloy of dimensions 10 × 20 mm (cylindrical shaped) specimens were cut using laser cut for color anodizing and Type II gray color anodizing. Thereafter samples were processed at different parameters as well as by using distinct chemical compositions.
General Principle of Titanium Anodizing
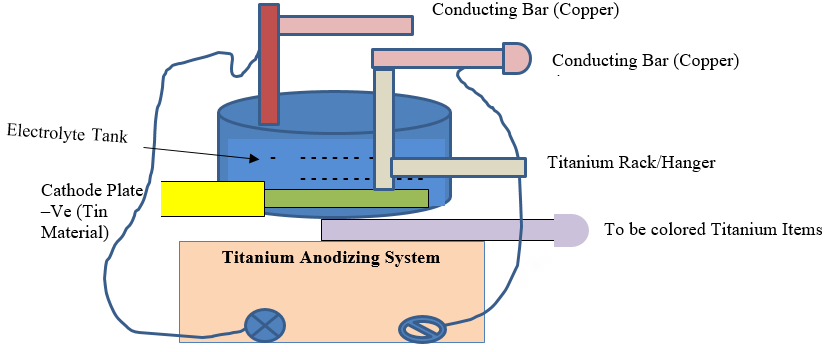
The general principles of the titanium anodizing process are as follows- (a) Electrochemical Reaction: Titanium anodizing is an electrochemical process that comprises the development of a thin oxide layer on the surface of titanium through an electrochemical reaction. (b). Oxidation: The surface of titanium is oxidized in the form of a thin layer of titanium oxide through the reaction with oxygen ions. (c) Anodic Reaction: The titanium surface acts as an anode and the oxygen ions as attracted to the surface, causing the oxidation reaction. (d) Cathodic reaction: The cathode (called +ve electrode) is where the reduction reaction occurs, mainly consisting of the hydrogen gas. (e) Electrolyte: The electrolytes (chemicals) comprise ions that provide the electrochemical reaction. (f) Current and Voltage: The process of titanium anodizing is controlled by mainly applying the specific voltage & current to the chemical solution/ electrolyte. (g) Temperature of Electrolyte: It also affects the process it must be controlled. (h) Anodizing time: It controls the oxide layer thickness, with a long duration of time resulting in a thicker layer. (i) Proper surface preparation: It is important for achieving a uniform & adherent oxide layer (e.g. etching, cleaning, polishing, powder blasting, etc.). (j). Post-treatment: is an important step for improving the properties of the anodized layer. Post-treatment includes sealing etc. The anodizing process principle and Tank sequence are shown in Figures 2 & 3 respectively.

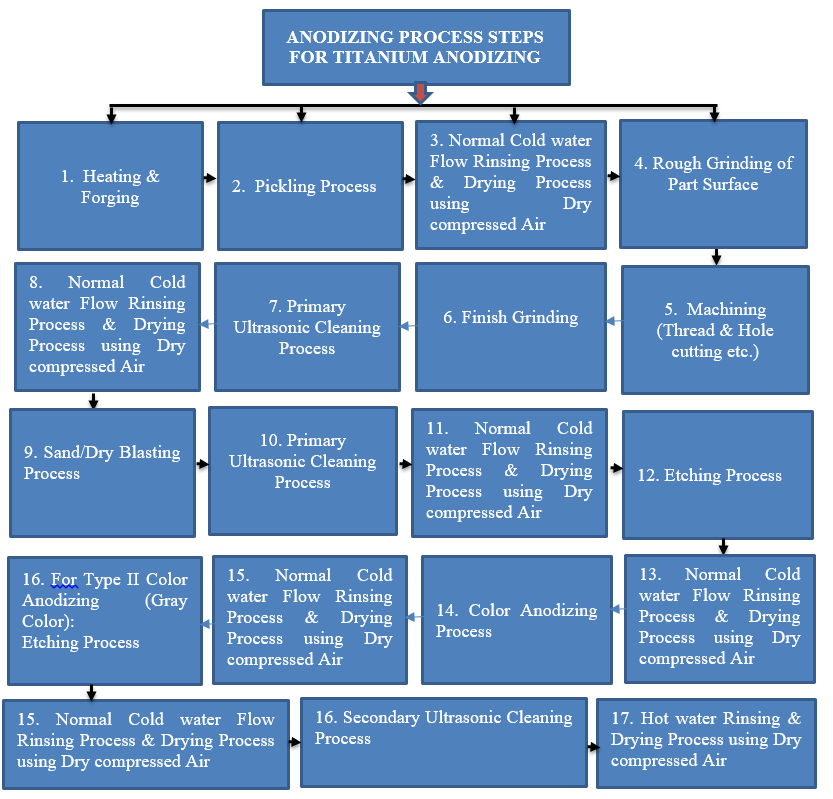
In addition the general steps, processing parameters used with detail description of the anodizing process given below Figure 4.
Selection of Processing Parameters, Steps, and Chemicals Used During Anodizing
The extensive literature study experiments were used in prior current investigation, for the selection of the optimum combination of process parameters and chemicals. The detailed steps of the anodizing process used during anodizing are explained in the section below.
As the heating and forging process is completed, by the optimum parameters, the pickling process were utilized for removing surface contamination by immersion in a strong acidic chemicals of temperature 28-32° C for 38-40 seconds using a mixture of 5 ± 2% HF (Hydrofluoric acid) and 20 ± 2% HNO3 (Nitric acid), to ensure surface cleaning/removal of heating & bending defects. The pickling process removes the material but etching is greater to create a roughened surface texture. Remember that do not use the wire brush for cleaning because it can damage the surface, metal particles can introduce contamination such as metal particles, and debris onto the surface. After the Pickling process needs to use an ultrasonic cleaning process for remove the pickling solution effect by using cleaner/with a mild detergent etc., DM water rinsing & air drying respectively. Thereafter follow another step as explained in the section below.
Step 1. Surface Preparation Using Manual and Automatic Polishing
There are two methods i.e. manual & automatic, for part preparation which is essential to perform, and two methods can use any one of the methods to enhance the surface quality as well as for optimal anodized layer adhesion. Thus the detailed advantages and limitations of these processes step by step are given below.
- Manual Polishing: The manual polishing process is just performed before the degreasing (ultrasonic cleaning) & just after part production. Manual polishing is performed for removal of tool marks, minor scratches/ pits, imperfections, sharp edges, and burrs, which further help in creating a smooth/even surface, good appearance/luster & finally enhance the quality of the anodizing layer.
- Automatic Polishing: The role of the automatic polishing process is similar to that of the manual polishing process but the only difference is that it provides consistent surface finish & quality across all the parts, suitable for processing high quantities of parts while maintaining a similarity/maintaining the same surface finish, precision control on processing parameters (speed, time, coolant, water & media, processing method), greater luster. Thus it is a good method for part preparation as compared to manual polishing but it is a costlier process than manual polishing because of setup cost, media, water, and compound used. Note: If the heating and bending process is applied to parts then ensure the part surface is properly cleaned by using a wire brush, thereafter move the part for the polishing process, which further helps in effective anodization on the part and chances of related defect occurrence such as white dots after anodization or improper coloring/color fed issue, etc. removed totally. Hence effective surface preparation is necessary for effective color. In the current study manual polishing were carried out process the samples. (polishing wheel+AMAR AP Media) etc.
Step 2. Ultrasonic Cleaning Process (Primary)
The ultrasonic cleaning process is mandatory after the polishing process (manual/automatic) because it helps in the removal of polishing dust/contaminants, even complex shaped parts can be cleaned effectively, dirt, machining oils, greases, loose particles, small machining burrs, residues. Thus good cleaning is highly essential because it reduces the contaminant risk & ensures the further stronger bond between the part & anodized layer. In this study for fine cleaning the optimum parameters are (cleaning time of 5-8 minutes, a cleaning temperature (of 55°C-60°C), a high- quality cleaning agent good quality water (DM), of zero TDS, and a method of part dipping based upon geometry i.e. vertically/horizontally (e.g. hollow shaped part dipped in vertically), ultrasonic frequency (20-25 KHz) for removal of large particles, dust, in case of medical devices). Different tests can be used for the effectiveness of the cleaning process such as TOC, THC, Bioburden, etc. & monitoring of the process using foil test, etc.
Step 3. Normal Cold Water Rinsing Process
The water rinsing process is mandatory to consider after the ultrasonic process because this process helps to remove the chemical residue effect of the previous process etc. The dipping time of 10 minutes, with normal DM water temperature, was used. For cleaning purposes (for small burr removal) also used white nylon bristles 13x38x180mm reusable type in this study.
Step 4. Drying Process
The drying process is used after cleaning to prevent water spots or mineral deposits. To dry the part surface desiccant compressed air (dry compressed air) was moisture-free after the ultrasonic cleaning process. The gun material is made of an SS/polyurethane (PU) coated gun. The pressure used for drying is 2-4 bar, flow rate of 0.3-0.6m3/min. , drying time 35-50 sec. (based upon part geometry) Excessive pressure can damage the implant surface so ensure to use of optimum parameters. During cleaning of parts for wipe purposes, the white/blue color lint-free cloth (such as oil, coolant, ultrasonic detergents wipe) & lint free swap to make a free from deburrs, in case of complex shaped parts were used.
Step 5. Dry Blasting Process
The dry blasting process is performed after ultrasonic cleaning, cleaning & drying for surface cleaning /surface preparation (it removes contamination, and residual from the surface, improves mechanical interlocking for anodized layer, improves surface finish as well, and closes the manual polishing scratches, etc.).
This process is performed manually (by the operator) then it is not possible to develop a uniform roughness on the part surface, & for proper adhesion requirement (bone to part) osseointegration, the small roughness surface of the part needs to be maintained especially for medical devices. However, the limitation of this process is that the excessive blasting can damage the surface, creating scratches or pits, over roughness (causing surface fatigue). In this investigation the proper selection of blasting media (size) & optimum process parameters used are (S.O.D. 70-80mm), blasting time 120 sec., or depend upon part size, optimum blasting angle 95°, blasting pressure 4-5 bar), an experienced operator can help achieve the required surface roughness. Finally, use compressed air drying for escaping sand particles so that further color can be produced effectively. The glass bead powder designation AH size 45-90 microns (for less rough surfaces e.g. plate, nail, screw, etc.) and designation A particle size 600-850 (for high rough surface) which can be used based upon requirement (e.g. Hip implants required course surface while facial implants smooth/less rough surface).
Step 6. Ultrasonic Cleaning Process (Secondary)
Ultrasonic cleaning is an important step that is highly important to consider after dry blasting because it helps to remove remaining blasting media or debris from the part surface and remove surface contaminants, or residues introduced during blasting. The proper cleaning further helps in ensuring the strong bond between the titanium surface and the anodizing layer. It is important to consider avoiding harsh chemicals & use optimum process parameters (temp. cleaning time, ultrasonic frequency, power, etc.). Temperature: 40 ± 2 ° C; Chemicals: optimum combination of NaOH (sodium hydroxide) or caustic soda and surfactant + Time: 10 ± 2 minutes & Ultrasonic frequency 30-40 KHz were utilized for precision cleaning, removing small particles & surface finish. In addition, the anodizing chemicals are available & used in different concentrations of percentage & kg. So for calculation, the knowledge of the density of each chemical is important. In this study also used lint free white color cloth for visual strain, oil and coolant residue, and water mark for wiping purpose.
Step 7. Normal Cold Water Rinsing Process
Again repeat the normal cold water rinsing process after the ultrasonic process for chemical effect removal of the previous process etc.
Step 8. Drying Process
Apply the dry compressed air drying process after the normal water rinsing process for water spot removal etc.
Step 9. Etching Process
The etching process is very important to perform before color anodizing because it creates a uniform smooth surface with lesser roughness as compared to dry blasting which is essential to gain the effective anodizing color in the further process. For the etching process, different chemicals combinations in optimum ratio (Ammonium bi fluoride+Hydrofluoride+Nitric+DM etc.) can used at room temperature/25-35°C, but controlled etching (i.e. dipping time 15-30 sec.) is essential to consider. Because in this process material is removed, excess/incorrect etching time application surely decreases its part dimension or can create tolerance issues. The etching chemical can be changed by estimating the surface area of the part processed into the chemicals. If the chemical level in the tank due to continuous use decreases then do not add the chemical because its concentration imbalance, pH level change, contamination issues can arise, etc. Titration method/pH paper or color of the solution changes to dark green (if pH>2 to 2.5) then need to add new etching chemicals. In addition, if see no ending reaction on the standby condition &/or mix any other chemicals & water to the products then immediately need to change the etching chemical. So, do not leave any part in the etching tank & for regular monitoring, pH measurement is the best test for chemical change.
Step 10. Normal Cold Water Rinsing Process
Again repeat the normal cold water rinsing process after the etching process for the removal of chemical effect/ residue etc.
Step 11. Drying Process
Apply the dry compressed air drying process after the normal cold water rinsing process for water spot removal etc. Step 12. Color Anodizing Process In color anodizing a thin layer of Ti oxide is added when the electrical current is passed through an electrolyte solution, this may be due to the chemical reaction. The major roles of color anodizing on Ti alloy, especially for orthopedic applications are enhancement of appearance (aesthetics), providing resistance against corrosion naturally, helping to surgeon for identify specific implant types, batches, or sizes/ surgeon easy-to-handle implants during surgery, improving biocompatibility. FDA and CE recommend using different colors on implant surfaces such as brown, blue, silver, golden, pink, peacock, and green by setting the different voltages. The control over parameters such as dipping time & voltage is highly important during color anodizing. Processing parameters are the temperature of chemicals 20 ± 2 ° C, voltage 10 to 77V; electrolyte: ammonium sulfate (NH4)2SO4 at a optimum concentration of percentage. During the dipping of the parts in chemicals the fixed voltage is most important to maintain throughout the dipping time, in the anodizing setup because it ensures color uniformity and provides a consistent oxide layer. Thus the risk of over or under-anodizing can be reduced by constant voltage & can achieve better control over the process. If the chemical level in the tank due to continuous use if decreases then try to replace the total chemicals, because if we monitor the process chemical pH changes. In some cases first time only can add the chemical max. Upto 10%. If titration method/ pH paper or color is not obtained, (eg. working range pH>10.5 to 12.5) then need to add new etching chemicals. In addition if see no ending reaction on the stand-by condition &/or mix any other chemicals & water to the products, or if white deposits occur on the wall of the tanks & titanium products then immediately need to change the electrolyte. So, remember that do not leave any part in the chemical tank & for regular monitoring pH measurement is the best test for chemical change. In addition, remove the cathode plate when not used for more than 8 hours, because it can corrode, contaminating the solution & affecting the color anodizing process, The solution degrades the cathode plate if it is dipped into it for a long time and results in inconsistent color. So daily inspection for corrosion/wear is important to ensure consistent color anodizing results.
Step 13. Normal Cold Water Rinsing Process
Again repeat the normal cold water rinsing process after the removal of electrolyte for the residue etc.
Step 14. Drying Process
Apply the dry compressed air drying process after the normal cold water rinsing process for water spot removal etc. For Type II (Dark gray color) Repeat steps 1 to 10 thereafter move for Type II anodizing, which is explained below.
Step 15. Type II Anodizing
In this type of anodizing process, we obtained a dark gray color. When comparing the color anodizing with type II (Dark gray color) the highest oxide layer thickness can be achieved. However, the use of control parameters (dipping time 5 minutes & fixed voltage 133V) during processing of part is highly important for consistent uniform color. The different chemicals & their optimum ratio/composition were used such as orthophosphosphoric + Sulphuric + etc).
The type II chemical can be changed by estimating the surface area of the part processed into the chemicals. If the chemical level in the tank due to continuous use decreases then do not add the chemical because its concentration imbalance, pH level change, contamination issues can arise, etc. The apparatus such as the hydrometer working range (89-66 Baume eye check color is dark green black & if the color is not achieved at a constant voltage then need to change the chemicals. In addition, if see no ending reaction on the standby condition &/or mix any other chemicals & water to the products then you need to change the etching chemical. Also, do not leave any part in the chemical tank & for regular monitoring, pH measurement is the best test for chemical change by considering the surface area of the parts. To increase the high luster finish after the Type II color on the Ti alloy surface ceramic polishing media can be used because it does not damage the anodized layer/scratch the part surface, or not react with the Ti and anodized layer. However, the processing parameters need to be considered. Thus thoroughly cleaning the part after ceramic polishing is highly important to remove any residual media and from contamination risk.
Step 16. Normal Cold Water Rinsing Process
Again repeat the normal cold water rinsing process after the removal of electrolyte for the residue etc.
Step 17. Drying Process
Apply the dry compressed air drying process after the normal cold water rinsing process for water spot removal etc. Note: Powder-free sterile gloves, sterile cloth e.g. microfiber cloths (use a clean, lint-free, nonabrasive cloth that helps to prevent scratching, prevent contamination), cleaned basket, regular cleaning is highly important in the anodizing process because it prevents contaminants & residue, not introduce bacteria/other microorganisms, ensure clean handling, consistent anodizing that ensure consistent results. In this way, the anodizing process steps are completed.
Recommendation for Effective Use of Titanium Anodizing Process
Several points need to be considered before the start of the anodizing process. But a few important points are discussed below that need to always consider. The PP (polypropylene) material for chemical storage tank is highly recommended owing to chemical resistant, corrosion resistance, leak proof, non porous that decrease the risk of contamination, clean easly, light weight, cost effective, meet the regulatory standard like FDA/UN etc., Alarm system should be their in the machine if any variation in the machine will happen it can alert the operator, cathde plate should be highly conductive material such as Tin, titanium hanger , copper material (anode bar, daily cleaning (hanger, Cu bar (anode), cathode Tin sheets, daily use of fresh DM water, during processing use of flow water rinsing & spray rinsing etc., avoid the use of any oils after anodizing for lusture etc. such as coconut oil etc., can use for lusture after anodizing process (e.g. OTEC process by the use of ball shaped ceramics shining media), fill the water and chemical tanks 4-6 cm below of the total depth for proper/safe handling, use of lux meter for measurement of avg. lght intensity in work area need to maintain (acceptance criteria i.e. avg. light intensity should be greater than 650 lux needed as per ISO 14644-3 for weight change confirmation of part the precise weigh machine can be used (e.g. etching process), etching process important to consider prior to color anodizing and type II anodizing, to reduce the residue of dry blasting media (powder) after dry blasting ultrasonic cleaning imp. To consider) the use of MSDS (material safety data sheet) for ensuring the safe handling, use, storage, disposal, chemical properties, environment protection, hazard, and safety precaution-related information) and COA certificate of analysis (ensuring the quality and authenticity of chemical, provide documentation of the chemical composition, purity, physical properties, specification limit (e.g. pH diluted 3 rapid enzyme cleaner 7.5-8.5 but results 7.9pH value), also follow the manufacturer/vendor/supplier instructions such as manual (m/c). In addition, all the measuring and testing instruments/apparatus should be calibrated before use such as pH meters, surface roughness testers, coating thickness gauge, etc.
The chemicals, and processing parameters used are given in Table 2, while Table 3 represents the images of samples at constant voltage respectively.
| Process | Parameters and Chemical Used |
|---|---|
| Pickling Treatment | Temperature 28-32° C for 40 seconds using a mixture HF (Hydrofluoric acid) & HNO 3 (Nitric acid). (In optimum ratio based upon literature & practical knowledge). |
| Ultrasonic Cleaning (Primary) | Cleaning time (5-8 minutes) or as per condition of part can vary, cleaning temperature (55°C-60°C) , good combination of Cleaning agent (Tu-caustic (powder) + Tu Ultra Clean (liquid); +DM water and ultrasonic frequency (20-25 KHz). (In optimum ratio based upon literature & practical knowledge). |
| Rinsing | Water: DM; Temperature: 20 to 25 ° C; Dipping time: 10 minutes. |
| Drying | Desiccant compressed air (dry compressed air); Pressure 2-4 bar, flow rate 0.3-0.6m3/min. , drying time 30-50 sec. or more (based upon part grometry& size). |
| Sand Blasting | S.O.D. 70-85 mm, blasting time 120 sec., blasting angle 85-95°, blasting pressure 4-5 bar. Glass bead particle size AH size 45-90 micron for smooth /less rough surface & particle size 600-850 (for surface of high course/rough) can be used based upon surface requirement (low or high friction requirement). (In optimum ratio based upon literature & practical study). |
| Ultrasonic Cleaning (Secondary) | Temperature: 40 ± 2 ° C; Chemicals : NaOH (sodium hydroxide) or caustic soda and surfactant at a optimum concentration Time: 10 ± 2 minutes; Ultrasonic frequency 30-40 KHz (In optimum ratio based upon literature & practical study). |
| Etching Process | Temperature/25-35°C, dipping time 15-30 sec., Chemicals: Ammonium bi fluoride+Hydrofluoride+Nitr ic+DM+ etc. (In optimum ratio based upon literature & practical study). |
| Color Anodizing | Temperature of chemicals 20 ± 2 ° C, voltage 10 to 77V (constant voltage based upon color requirement); Electrolyte ammonium sulphate ((NH 4 ) 2 SO 4) at a optimum concentration dipping time 60 sec. (In optimum ratio based upon literature & practical study). |
| Type II (Dark Gray Color) | Orthophosphosphoric + Sulphuric 8% by volume, Dipping time 5 minutes, Voltage 133V and repeat the process of water rinsing and drying. |
Table 4: Chemicals, Processing Parameters Used.
| Color Anodizing: | |||
|---|---|---|---|
| Sample No. | Constant voltage | Image | Color achieved |
| 1 | 10 | Brown | |
| 2 | 21 | Blue | |
| 3 | 37 | Silver | |
| 4 | 45 | Golden | |
| 5 | 55 | Pink | |
| 6 | 64 | Peacock | |
| 7 | 77 | Green | |
| Type II (Gray Color Anodizing): | |||
| 8 | 133 | Dark Gray |
Table 5: Voltage, Color Produced and Their Sample Images.
From the above picture of samples concluded that the varying voltage also affects the color spectrum. Table 3: Voltage, Color Produced and Their Sample Images.
Results of Coating Thickness, Chemical Analysis after Anodizing, Verification for Anodizing Layer Insulation, and Current Value
Coating Thickness Measurement: In this study, the coating thickness was measured for low voltage anodized sample no.1 (10V) brown color and anodized sample no.8 (133V) Dark gray color with the use of a coating thickness gauge. The coating thickness was measured at 0.9µm for brown color and 3µm for type II gray color. The constant voltage was used during the anodizing process to achieve a consistent uniform layer thickness. Hence, from the test results it is concluded that as the voltage increases the oxide layer thickness also increases. Chemical Analysis after Anodizing: Chemical analysis was also used to know the changes in elemental composition before and after anodizing. The sample 2 and sample 4 was used during the test. The test results revealed that on any major change of elemental composition, all the elements of material (such as Titanium, Aluminum, Vanadium, Iron, Oxygen, Nitrogen, Carbon, Hydrogen, etc.) after testing met the specified requirement of ASTM B265 & ISO standard. Test results indicate Fe 0.19%, carbon 0.04%, nitrogen 0.03% , Ti 98.7% and remaining other elements. Verification for Anodizing Layer Insulation and Current Value: For current measurement, whether the anodized sample is conductive or insulator confirmation the clamp meter (for current measurement) was also used to check the surface of anodized samples and whether the current passes or not. Test results revealed that we can’t say that the anodizing layer is insulated i.e. current is passed over the anodizing layer. In addition, for current value, it is also seen/noted that voltage can be constant, but current always varies i.e. as the load increases (i.e. no. of sample increases) the current value also increases. Hence current value (Amp.) can not possible to noted down. In actuality when using the sample for coloring during starting the Amp. First increases for a few seconds, and then goes down, and finally i.e. at the end of the process, it becomes zero. Thus voltage is a fixed value throughout the process hence it can noted but current varies so it can not noted in the anodizing process. Finally, all the samples were checked for the examination of fingerprints, and 65-70% improvement was observed. This may be due to the use of optimum process parameters, chemical ratio, and the use of surface surface preparation steps on the samples, etc.
Conclusion
In the present investigation, PureTitanium, material Grade 4 manufactured samples were examined experimentally using constant voltage & processing parameters to know the color spectrum, quality of color, fingerprint effect, elemental composition, coating thickness after anodizing, etc. were analyzed experimentally and the following conclusions were drawn:
- The uniform and good-quality color spectrum throughout the length of the sample was obtained, this is owing to the constant voltage used during anodization. Apart from this during visual inspection after the anodizing process no discoloration, patches, fading, or other defects were seen.
- As the voltage changes from lower to higher value, the color is obtained. Thus voltage plays a major role in the achievement of different colors.
- Coating thickness was increased, i.e. voltage is directly proportional to oxide layer thickness. At 10V the coating thickness was 0.9µm, while at 133V the 3µm oxide layer thickness was obtained.
- No major change in the element composition was observed after the anodizing when comparing the elemental composition of anodized and non-anodized material, and it met the standard requirement.
- The 65-75 percent fingerprint issue has been resolved due to the use of the best combination of electrolyte & processing parameters/ proper surface treatment etc. Every manufacture ensure to use the powder-free gloves during the anodizing process for best results. Apart from this, when all the anodized samples are compared with the master color gauge, all are found to be completely pass.
Future Scope
The effect of voltage on hardness (knop hardness tester as per ASTM D1474), biocompatibility (cytotoxicity) as per ISO 10993-5, voltage effect on surface roughness, crystal structure, hardness pencil test as per ISO 15184, weight change measurement, microscopical technique for oxide layer thickness measurement as per ISO 1463, residual acid test by FTIR, coating adhesion test as per ASTM D4541-22, and effect of different chemicals on anodized surface for long term corrosion study, etc. can be considered in the future study.
Acknowledgment
The authors are highly thankful to Chandigarh Group of Colleges Landran and Auxein Medical Pvt. Ltd. (Haryana) for motivation for this research work.
Author Contribution
Dr. Santosh Kumar Professor (Mechanical Engineering Department) & Head of NCC Deptt. (CTO), Chandigarh Group of Colleges Landran Mohali, Punjab (India): Help in selecting the proper chemical ratio & treatment, test analysis etc. Dr. Rakesh Kumar: Help to complete the written task, help in literature searching & practical study etc.
References
-
Sharma AK (1992) Anodizing titanium for space applications. Thin Solid Films 208(1): 48- 54.
-
Bartlett L (2006) An unusual phenomenon observed when anodising CP titanium to produce coloured surfaces for jewellery and other decorative uses. Optics & Laser Technology 38(4-6): 440-444.
-
Hoque ME, Showva NN, Ahmed M, Rashid AB, Sadique SE, et al. (2022) Titanium and titanium alloys in dentistry: current trends, recent developments, and prospects. Heliyon 8(11): e11300.
-
Yang B, Uchida M, Hyun-Min K, Zhang X, Kokubo T (2004) Preparation of bioactive titanium metal via anodic oxidation treatment. Biomaterials 25 (6): 1003-1010.
-
Napoli G, Paura M, Vela T, Schino AD (2018) Colouring Titanium Alloys by Anodic Oxidation. Metalurgija 57(1- 2): 111-113.
-
Rajguru NS, Kahar SD, et al. (2019) Review on Colouring Effect & Physical Properties of Anodized Titanium and its Alloy. Journal of Engineering Research and Application 9(8): 60-67.
-
Liua X, Chub PK, Dinga C (2004) Surface modification of titanium, titanium alloys, and related materials for biomedical applications. Materials Science and Engineering R 47(3-4): 49-121.
-
Yang B, Uchida M, Kim HM, Zhang X, Kokubo T (2004) Preparation of bioactive titanium metal via anodic oxidation treatment. Biomaterials 25(6): 1003-1010.
-
Kahar SD (2014) Corrosion Behaviour of Titanium Anodized Film in Different Corrosive Environments. Int Journal of Engineering Research and Applications 4(7): 17-2.
-
Kahar SD (2013) Characterization and Corrosion Study of Titanium Anodized Film Developed in KOH Bath. Int Journal of Engineering Research and Applications 3(5): 441-445.
-
Masahashi N, Mizukoshi Y, Semboshi S, Ohmura K, Hanada S (2012) Photo-induced properties of anodic oxide films on Ti6Al4V. Thin Solid Films 520(15): 4956- 4964.
-
Davies M (2003) Aerospace Paints and Protective Coatings, In: Standard Handbook for Aeronautical and Astronautical Engineers, 1st (Edn.), McGraw Hill Education, pp: 10.
-
Geng H (2004) Finishing metal surfaces, In: Manufacturing Engineering Handbook, 1st (Edn.), McGraw Hill Professional, pp: 35.
-
Karambakhsh Ali, Abdollah A, Shahram G, Pejman M (2010) Pure Commercial Titanium Color Anodizing and Corrosion Resistance. Journal of Materials Engineering and Performance 20(9): 1690-1696.
-
Hlinka J, Dostalova K, Cabanova K, Madeja R, Frydrysek K, et al. (2023) Electrochemical, Biological, and Technological Properties of Anodized Titanium for Color Coded Implants. Materials 16(2): 632.
-
Wadhwani C, Brindis M, Kattadiyil MT , Brien RO, Chung K (2017) Colorizing titanium-6aluminum-4vanadium alloy using electrochemical anodization: Developing a color chart 119(1): 26-28.
-
Manjaiah M, Laubscher RF (2016) Effect of anodizing on surface integrity of Grade 4 titanium for biomedical applications. Surface & Coatings Technology 310: 263- 272.
-
Vattanasup C, Kuntiyaratana T, Rungsiyakull P, Chaijareenont P (2023) Color Formation on Titanium Surface Treated by Anodization and the Surface Characteristics: A Review. CM Dent J 44(2): 13-21.
-
Saraswati WC, Anawati A, Jujur N, Gumelar MD (2020) Effect of Coloring by Anodizing on the Corrosion Behavior of Ti-6Al-4V Alloy). AIP Conference Proceedings 2232(1): 020004.
-
Kumar A, Kushwaha MK (2021) Surface modification of titanium alloy by anodic oxidation method to improve its biocompatibility. Current Science 120(5): 907-914.
-
Mallaiah M, Gupta RK (2020) Surface Engineering of Titanium Using Anodization and Plasma Treatment IOP Conf Ser Mater Sci Eng 943: 012016.
-
MV Diamanti (2011) Anodic Coloring of Titanium and Its Alloy for Jewels Production. Wiley Periodicals pp: 1-7.
- Solution-Processed Chiral Perovskites for Biomedical Applications
- Nanotechnology in Health Chemistry and Medicine: Current Challenges and Future Directions
- Human Exposure to Micro- and Nanoplastics: Pathways, Toxicity, and Intervention Strategies
- Exosome Nanomedicine for Cancer Therapy
- Micro and Nanoplastics–Plastisphere, Biotoxicity, Impact on Human Health, and Mitigation Strategies
- Process Validation of Cefixime Powder for Suspension Dosage Form, 50 mL